TechRadar Verdict
A wonderful NAS solution for putting an out-of-commission machine to good use, especially because of its useful plugins.
Pros
- +
Easy to administer
- +
Supports multiple RAID levels
- +
Hardware support
- +
Plugins-infrastructure
Cons
- -
Lacks enterprise-NAS features
Why you can trust TechRadar
One FreeNAS developer’s suggestion for implementing the popular FreeBSD-based NAS solution over Debian led to the creation of Open Media Vault (OMV).
We’ve featured the project several times since the project’s first release almost a decade ago. Most recently, Jonni used it in LXF269 to show you how to run the Plex streaming media server via Docker on top of OMV.
If you’re familiar with the concept of NAS (and even more so if you’ve used one), you’ll agree that this kind of use is well outside the purview of a NAS. It’s possible because OMV has an impressive plugins system that you can employ to supercharge your NAS and use it more than as a simple file server.
- Check out our list of the best NAS and Media Server distros
- These are the best NAS devices available in 2021
- Here are the best file hosting services
This review first appeared in Linux Format Magazine, Issue #270, published in December 2020.
Installable media for OMV is available for 64-bit machines, but you can also install it on top of an existing 32-bit Debian installation. OMV even supports several Arm architectures including the one that powers the Raspberry Pi.
In addition to hard drives and SSDs, you can also install OMV on USB sticks and flash media, which is especially useful if you plan to use a single-board computer (SBC) like the RPi.
Since OMV is designed to take over the entire disk, installation is pretty straightforward. When it’s up and running, you can configure and manage the NAS using OMV’s browser-based administration interface.
If it ain’t broke...
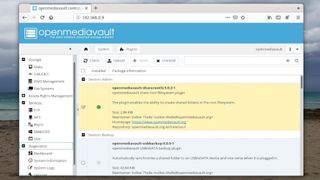
Apart from a tweak here and there, the interface hasn’t changed much since the initial days. The multilingual interface is laid out pretty logically and you can step through the menus from top to bottom to set up your NAS.
The project has ample documentation and you should take some time to run through it to acquaint yourself with the deployment process.
With OMV you can use the connected disks individually or tie them into a software RAID. By default, the drives are formatted as ext4, but you can choose to use them as ext3, btrfs, xfs and jfs file systems. OMV supports multiple RAID levels and each requires a different number of disks.

For instance, the default RAID level 5 requires a minimum of three disks, while RAID 1 that mirrors data across drives only needs a minimum of two. When you select a RAID level, OMV will tell you the minimum number of disks you’ll need for the selection.
Then there’s user management, which is just a graphical interface for creating users in the underlying Debian base. Very helpfully, in addition to adding individual users, OMV enables you to import a bunch of users by specifying them all in the relevant format.
This section also makes it possible for you to define access control parameters via an easy-to-follow interface. Once you’ve defined your NAS, you can make it visible on the network using any of the popular protocols, including NFS, SMB/CIFS, FTP, SSH and rsync.
Straight out of the box, OMV is a very capable distro for deploying a NAS. However, it’s the set of plugins that kick its usability into overdrive. OMV has a bunch of official as well as third-party plugins that you can install and enable as per your needs and requirements.
If the drive you’ve installed OMV on has lots of free space, you can create shared folders inside it using one of the official plugins. There’s another one that’ll keep an eye on the disks to make sure you can catch a bad disk before it goes kaput.
These official plugins are well supported by the community maintained Extras plugins (such as the Docker and Portainer one that Jonni used) that you can install following the simple instructions listed at www.omv-extras.org.
| Developer | Volker Theile | Row 0 - Cell 2 | Row 0 - Cell 3 |
| License: | GPLv3 | Row 1 - Cell 2 | Row 1 - Cell 3 |
| Features | 8/10 | Ease of Use | 8/10 |
| Performance | 9/10 | Documentation | 8/10 |
| Overall Rating | 8/10 | Row 4 - Cell 2 | Row 4 - Cell 3 |
With almost two decades of writing and reporting on Linux, Mayank Sharma would like everyone to think he’s TechRadar Pro’s expert on the topic. Of course, he’s just as interested in other computing topics, particularly cybersecurity, cloud, containers, and coding.


