Using Quick Action Workflows in macOS
Make life easier

Do you perform regular workflows on your Mac that seem to take up much of your time each day? There is a time-saving solution. You can create 'Quick Action' workflows to automate those tasks. Saved workflows are accessible through the 'Finder,' 'Services' menu, and, when applicable, the MacBook Pro Touchbar.
'Automator' is the secret sauce behind 'Quick Action' workflows. These contain a series of actions that are put together to complete a task. Long a part of macOS, 'Automator' introduced Quick Action workflows with macOS Mojave.
You can find 'Automator' by doing a Spotlight search on your computer or opening it from the 'Applications' folder. Once inside, you'll see the 'Library' pane on the left side. From here, you can add one or more actions to a workflow, which is located on the right side of the app.

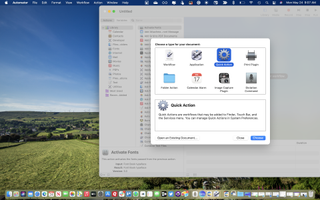
To get started using 'Quick Action' workflows, select File > New in 'Automator', then click 'Quick Action'. Select Choose.
From here, you can adjust any of the following at the top of the app:
- Workflow receives current: The type of data used as input to the workflow. If you choose Automatic, Automator guesses the type of input you want to use in your workflow.
- Application: The app or apps you want to use to process your workflow. Each app must be open for the workflow to be available.
- Input is: If the workflow receives input from URLs, addresses, phone numbers, dates, or email addresses, you can specify different input options.
- Output replaces selected text: When the workflow receives input from Text or Rich Text, you can specify that the output replaces the selected text.
- Image: An image for your Quick Action. You can select an image on your Mac or choose an image from the menu.
- Color: A color for your Quick Action (visible in the Touch Bar only).
Next, you'll want to add actions to your workflow. You do so by selecting a topic from the 'Library' on the left side of the app, then choosing an action or file from the second column. Drag this action into the workflow area.
When finished, go File > Save to keep the workflow. Saved workflows are shown in the 'Action' pop-up menu at the top of a Finder window and in the 'Services' menu. When in 'Column' or 'Gallery' View in Finder, 'Quick Action' workflows are located in the bottom window preview pane. On select MacBook Pro models, 'Quick Actions' are also accessible in the Touch Bar.
Get daily insight, inspiration and deals in your inbox
Get the hottest deals available in your inbox plus news, reviews, opinion, analysis and more from the TechRadar team.
Example Quick Actions
Two of our favorite 'Quick Action' workflows include those that close all apps and convert PNG files to JPG format.

1. Close all apps
When you find yourself inundated with open apps on your Mac, you can close them one at a time or save yourself time by using a 'Quick Action' workflow. With it, all the open apps are automatically closed.
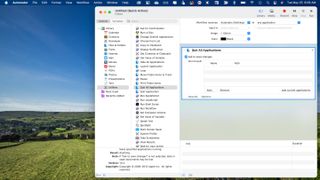
To create, in Automator, go File > New, then select 'Quick Action' from the menu, then select 'Choose'. Under 'Library' choose 'Utilities'. On the right, select 'Quit All Applications', then drag it to the main window. Check the box 'Ask to save changes' so you won't lose any unsaved work before the apps closing down. Also, consider adding apps to the 'Do not quit' list.
Next, go File > Save, give it a unique name, then click 'Save.'
The easiest way to run this 'Quick Action' workflow is by going into an open app (one that isn't on the 'Do not quit' list, then select the name of the app on the menu bar. Choose 'Services', then choose the workflow.
To create, in Automator, go File > New, then select 'Quick Action' from the menu, then select 'Choose'.

2. Convert PNG files to JPG format
When it comes to images, JPG is typically a better choice for online use than PNG. Using the following 'Quick Action' workflow, you can automatically save PNG files to JPG versions.
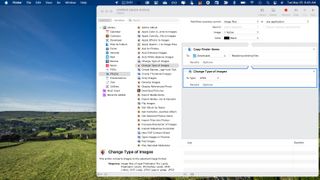
To create, in Automator, go File > New, then select 'Quick Action' from the menu, then select 'Choose'. At the top of the workflow area at the right, select 'Image files' next to 'Workflow receive current'. From the 'Library' on the left, choose 'Photos'. In the next section, choose 'Change Type of Images.' Drag to the right-hand workflow panel. Choose 'Add' in the pop-up message.
Under 'Copy Finder Items' choose the location to save the new JPG files. It can be in the same location as the original files.
Under 'Change Type of Images', choose 'JPEG' from the pull-down menu. Go File > Export to save the workflow and add the location. Typically, I save PNG files to the 'Downloads' folder, so that's where I save the workflow. Choose 'Save'.
Finally, double-click on the file you just saved. Click 'Install' in the pop-up. After doing so, you can right-click in Finder to convert a file using the 'Quick Action' workflow.
You can find other Automator workflow examples online.
Bryan M. Wolfe is a staff writer at TechRadar, iMore, and wherever Future can use him. Though his passion is Apple-based products, he doesn't have a problem using Windows and Android. Bryan's a single father of a 15-year-old daughter and a puppy, Isabelle. Thanks for reading!

