How to enable and use Ubuntu remote desktop
Access a Ubuntu desktop from anywhere

When you need to access a computer from outside your home or office, you’ll want to use the best remote desktop software. Having a remote desktop can enable you to access files on your work or home computer from anywhere. Or, you can access a client’s computer to offer technical support.
Whatever your goal, it’s relatively easy to learn how to set up a remote desktop connection. In this guide, we’ll show you how to enable and use a remote desktop on the Ubuntu operating system.
How to enable and use Ubuntu remote desktop: Preparation
Preparing your Ubuntu computer for use as a remote desktop is simple. Screen sharing is baked into the operating system if you’re using the latest version of Ubuntu (18.04), so you just need to download and install remote desktop software on the computer you want to use for remote access.
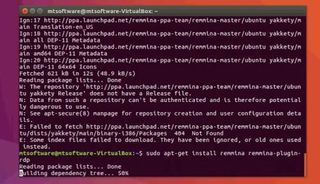
For this tutorial, we’ll use Remmina. This is free, open-source remote desktop software designed for Linux systems. To install Remmina on your control computer, open a command line terminal and enter the following:
sudo apt-add-repository ppa:remmina-ppa-team/remmina-next
sudo apt update
sudo apt install remmina remmina-plugin-rdp remmina-plugin-secret
Are you a pro? Subscribe to our newsletter
Sign up to the TechRadar Pro newsletter to get all the top news, opinion, features and guidance your business needs to succeed!

Remmina will install all required packages for you to use the remote desktop software.
Note that you’ll also need the IP address of the computer you want to connect to remotely. You can find the IP address by right-clicking on the network icon in the upper right corner of the desktop and selecting Connection Information.
You will need to be on the same local area network as the remote computer when connecting to a remote desktop using this IP address. If you’re on a different network, you’ll need to set up port forwarding. That is beyond the scope of this guide, as it requires modifying the remote desktop network’s firewall settings.
Step 1: Enable remote desktop sharing
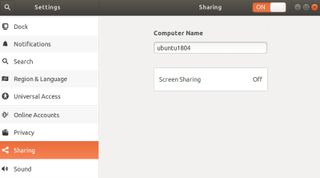
The first thing you need to do is to enable remote desktop sharing on Ubuntu. Open the system settings window by clicking on the tools icon in the top right corner of the screen. Then navigate to the Sharing tab in the left-hand menu in the system settings.
By default, screen sharing is turned off on Ubuntu. You can turn it on by clicking the On/Off toggle at the top of the window. Then click on the Screen Sharing button that appears below to configure the screen sharing options.

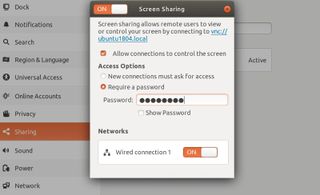
In this pop-up, turn screen sharing on by clicking the On/Off toggle and make sure the screen control option is checked. Then you must choose whether to require a password or permission when someone attempts to connect to this computer as a remote desktop. If someone will be at the computer every time you connect, then choose the ask for access option. If no one will be present or you’re not sure, choose the password option. Make sure you use a strong password to prevent unauthorized access to your remote desktop.

You can also decide whether to enable or disable any networks for remote connections. Make sure the toggle is set to On for at least one network. (You will only see multiple network toggles if the computer has both wired and wireless networks set up.)
Note that if you are planning to connect to a remote Ubuntu desktop from a Windows computer, you must disable encryption for remote connections. Open a command line on the remote computer and enter
gsettings set org.gnome.Vino require-encryption false
This will prevent any issues with incompatible encryption between Linux and Windows systems.
Step 2: Connect to the remote desktop
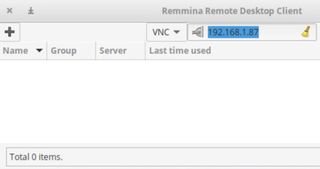
Now, you can connect to the remote desktop using Remmina. Search your control computer’s system for Remmina and open the program. In the drop-down menu, select VNC and then enter the IP address of the remote desktop. Hit Enter to make the connection.

At this point, you’ll either be prompted for a password on your control computer or with a notification on the remote desktop, depending on how you configured the screen sharing settings. Once you enter the password or approve the connection, you can begin working on the remote desktop. It’s always a good idea to test the remote desktop connection while you still have access to the remote computer to make sure there are no unexpected hitches.
Summary
By following these steps, you’ll be able to remotely control one Ubuntu computer from another or from a Windows desktop. You can take control of a remote computer even without having someone present at the computer. It just needs to be turned on in order to make the connection.
If you use Remmina as your remote desktop client, you can transfer files and modify the quality of your connection to handle low-bandwidth networks. If Remmina doesn’t quite suit your purposes, you can also try another top Linux remote desktop client. Note that the process for connecting may be slightly different, but you’ll still need to enable screen sharing on the remote Ubuntu desktop by following Step 1.
Need to set up a remote desktop on another computer? You can learn how to enable and use remote desktop on a Mac or on Windows 10.
- We've featured the best Linux remote desktop clients.
Michael Graw is a freelance journalist and photographer based in Bellingham, Washington. His interests span a wide range from business technology to finance to creative media, with a focus on new technology and emerging trends. Michael's work has been published in TechRadar, Tom's Guide, Business Insider, Fast Company, Salon, and Harvard Business Review.

