How to set up your own Google Docs alternative
If you’re seeking a secure and effective way of editing documents within your Nextcloud instance, Kseniya Fedoruk has the solution for you.
Configuring the connector
Once you’ve completed the installation process, begin configuring the program. Click your user icon in the upper right corner, go to Settings and locate the OnlyOffice settings page in the Administration section.
Start with the server settings: specify the address of the machine with OnlyOffice installed in the Document Editing Service address field. Make sure that the Nextcloud server address is accessible from OnlyOffice Document Server.
To protect your documents from unauthorized access, enter the Secret key in the corresponding field. Specify the same secret key in the OnlyOffice Document Server config file to enable the validation.
Sometimes your network configuration might not authorise the requests between the installed Nextcloud and OnlyOffice Document Server using the public addresses.
The Advanced server settings section enables you to set the OnlyOffice Document Server address for internal requests from the Nextcloud server and the returning Nextcloud address for internal requests from OnlyOffice Document Server.

Elsewhere in the Settings section you can restrict access to the editors to user groups within your instance, enable or disable the Open file in the same tab option and select file formats that will be opened with OnlyOffice by default.
Note that docx, xlsx and pptx files are opened directly for editing – all other formats will require a preliminary conversion. The ‘Open the file for editing’ setting enables you to choose csv, odp, ods, odt, rtf and txt formats to be auto-converted and opened directly for editing, too.
Are you a pro? Subscribe to our newsletter
Sign up to the TechRadar Pro newsletter to get all the top news, opinion, features and guidance your business needs to succeed!
The Editor customization settings section makes it possible to adjust the editor interface and change the presence or absence of the additional buttons. You can also select one of the viewing modes. Review mode enables users to see the changes made in a reviewed document when it’s shared for viewing.
In Final mode you’ll see the document with all the proposed changes accepted. Markup mode highlights the proposed changes, and in Original mode you’ll see the initial version of a document without any changes. After you’ve configured your OnlyOffice settings, don’t forget to save the changes.
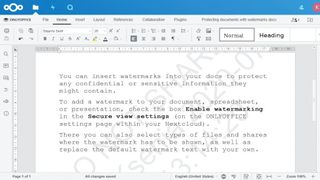
OnlyOffice, when integrated in your Nextcloud, enables you to insert watermarks into your documents to protect any confidential or sensitive information that they might contain. To activate watermarking, check the Enable watermarking box in the Secure view settings section.
You’re able to replace the default watermark text with your own using the supported placeholders: {userId} and {date} . These placeholders will be displayed individually for each user when they open a file.
You can also define groups to differentiate users for whom the watermark will be displayed, as well as select types of shares where the watermark has to be shown.
Using OnlyOffice within Nextcloud Start creating documents, spreadsheets and presentation files in Nextcloud by clicking the plus (+) button, or open the existing files.
Once the OnlyOffice editors are integrated, you’re able to: view, create, edit and collaborate on your documents, and co-author documents that are shared between different Nextcloud instances (Federated Cloud Sharing).
You can also work with the right-hand sidebar panel to track activities and share documents with other users, and share documents in a Talk chat per Drag & Drop.

Desktop environments
Once you have integrated OnlyOffice Document Server with Nextcloud, you’ll be able to connect the free OnlyOffice desktop application to your Nextcloud instance. Doing so makes it possible to use local plugins, your choice of fonts and a spellchecker facility.
You’ll also be able to directly access print service, and work with the buffer without experiencing any browser clipboard limitations.
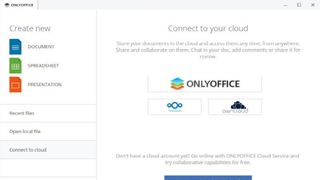
The connection process is straightforward. Launch the OnlyOffice desktop suite (you can always download the free version of the suite from the official website, click the Connect to cloud section on the left side panel and then select the appropriate icon.
Next, enter the address of your Nextcloud instance, and click the Connect now button. Sign in to your Nextcloud account entering your username and password. And you’re done!
If you have OnlyOffice online editors integrated into your Nextcloud instance, then Nextcloud Desktop 3.0 makes it easier and more convenient for you to edit documents stored on your local PC, which are then synchronized to the Nextcloud server.
To open and edit a document directly in your browser, go to the local sync directory that’s synchronised to the Nextcloud server and right-click the required document. In the drop-down menu, select Nextcloud and click Edit.
Your document will open in a new browser tab and you’ll be able to start editing the doc using the OnlyOffice online editors.
Other platforms
Nextcloud is only one of the services you can connect OnlyOffice with. You’re also able to use the editors within other popular sync and share platforms such as Confluence, Alfresco, ownCloud, Seafile, Plone, SharePoint, Liferay, HumHub and many others.
You can install the free version of OnlyOffice’s online editors or choose the scalable commercial build and then just connect the editors with the required service using ready-to-use integration apps.
If you need professional editing features for a family-size team, opt for Home Server. This is a special tariff plan that’s been put together for non-commercial home use.
