How to customize macOS Big Sur
Big Sur, big changes
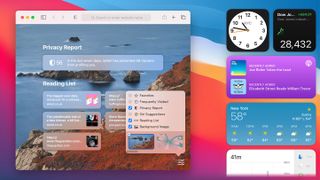
The latest Mac operating system (OS), macOS Big Sur, is the biggest overhaul to Apple’s desktop OS in years. Alongside a brand new modern visual redesign, Big Sur brings a whole host of customization options that make it much easier to put your own personal stamp on your Mac.
Whether it is new features like Control Center or tweaks to existing apps and workflows, macOS Big Sur has plenty of tools to help you shape it to your liking. In this article, we will look at some of the best and how you can make use of them.
- Want to go back to Catalina? Here's how to downgrade macOS
- How to download and install macOS Big Sur now
1. Customize Control Center
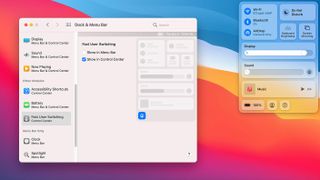
One of the biggest new additions to macOS Big Sur is the Control Center. Like in iOS 14, this is your one-stop shop for quick controls and options to tweak macOS settings on the fly. To access it, click the Control Center icon in the top-right of your screen (it looks like two toggles).
You can change which settings appear in Control Center by opening System Preferences and clicking Dock & Menu Bar. In the left-hand toolbar you will notice the Control Center heading. Click an option underneath it to choose whether it should appear in Control Center, the menu bar, or both.

2. Add settings to the menu bar
The customization possibilities offered by Control Center are not just limited to Control Center itself. In fact, you can drag out settings and switches onto the menu bar, saving them in place for easy access without ever having to open Control Center.
To do so, click the Control Center icon, then just click and drag a setting onto the menu bar. Your existing menu bar icons will automatically move out of the way.
This works well with commonly used settings like AirDrop and Bluetooth, especially if you find yourself toggling them several times a day. As well as that, adding the brightness and sound settings could save you repeatedly reaching for the Touch Bar or function keys.
Get daily insight, inspiration and deals in your inbox
Get the hottest deals available in your inbox plus news, reviews, opinion, analysis and more from the TechRadar team.
3. Widgets in Notification Center
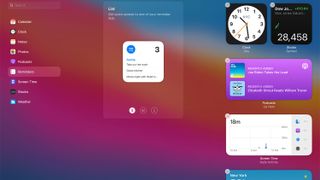
Control Center is not the only feature that shares ties with iOS 14. Just like in Apple’s mobile operating system, macOS Big Sur lets you add widgets to your workflow. These cannot be added to your desktop, but instead reside in the overhauled Notification Center – to access it, click the date and time in the top-right corner.
Scroll to the bottom of the list and click Edit Widgets. You will now see a screen with three columns – apps with widgets to choose from on the left, the currently selected widget in the middle (often with different size options), and widgets already in Notification Center on the right.
You can simply drag and drop widgets onto the Notification Center and rearrange existing ones with a few clicks. When you are finished, click Done at the bottom of Notification Center.
4. Customize the Safari start page
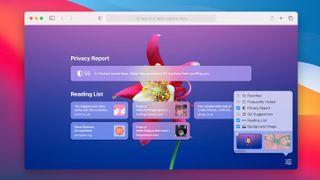
Safari has had a big update in macOS Big Sur, and many of its changes focus on customization. When you launch the Safari start page, click the toggle button in the bottom-right corner.
This will give you a few options: Favorites, Frequently Visited, Privacy Report, Siri Suggestions, Reading List, and Background Image. Each option has a checkbox next to it; uncheck one to remove it from the Safari start page. If Background Image is ticked, click the + button to set a new background picture using the default options or images on your Mac.
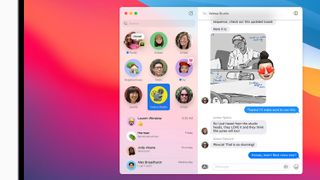
5. Pin your favorite conversations in Messages
Big Sur lets you pin conversations to the top of the pile in Messages. This is useful if you have a few people you talk to regularly and do not want them to get lost down the list of conversation threads.
In Messages, Ctrl-click a conversation in the left-hand column, then click Pin. The thread is then stuck to the top of the conversations list. Instead of the standard list view showing the person’s photo, name, and message content, you will see a large photo of them with their name underneath, helping them stand out more. You can pin up to nine conversations at once.
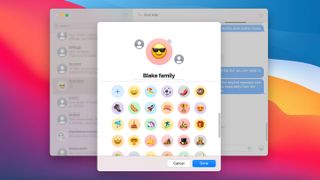
6. Set group photos in Messages
The Messages app has another new customization feature in Big Sur: you can set an image for a group involving multiple people. This can be the group members’ headshots, a contraction of the group name into its first initials, an emoji, a Memoji, or a photo from your Mac.
To get started, Ctrl-click a group, then click Details. From here, click Change Group Name and Photo. If you click an emoji or initial contraction, you can also change its background color. Clicking a Memoji allows you to change its expression.
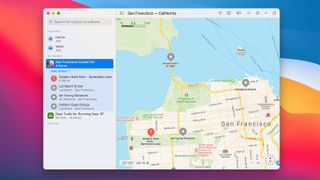
7. Create Guides in Maps
Apple has vastly improved Maps in recent years, and Big Sur is no exception. One of the key changes sees the introduction of Guides. These are essentially collections of related places grouped around a theme, such as hidden gems in your city or great hiking trails near you.
To create your own guide, open Maps and click Add Guide in the sidebar. Give it a name, then navigate to a place you want to add. Click and drag the place’s icon from the map to the guide, then keep doing this for all the places you want to add to the guide.
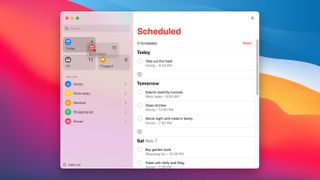
8. Customize the Reminders app
Apple’s Reminders app has not had a huge overhaul in macOS Big Sur, but it comes with a couple of new customization options that make it more useful than it was previously.
The first of these is the ability to rearrange your smart lists. By default, the Today list is the most prominent in the top-left corner, but if you would rather a different list occupied this spot (or any other), just drag and drop it into place.
The other change is that you can now add emoji to the names of your Reminders lists. Ctrl-click a list, click Rename, then click Edit > Emoji & Symbols in the menu bar to add an emoji.
9. Add items to share sheets
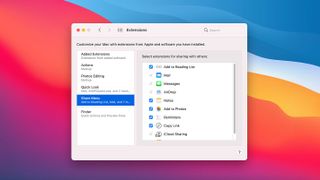
Although share sheets are not new in macOS Big Sur, they have been redesigned, with a cleaner look that brings more clarity. To customize which items appear on your share sheets, find a shareable item (such as an image or website link) and either click the Share button or Ctrl-click it and click 'Share'.
Click 'More' at the bottom of the share menu to open System Preferences. From here you can add or remove items on the share menu by clicking the checkbox next to each item.
When you are finished, simply close System Preferences.
- These are the best MacBooks and Macs

Alex Blake has been fooling around with computers since the early 1990s, and since that time he's learned a thing or two about tech. No more than two things, though. That's all his brain can hold. As well as TechRadar, Alex writes for iMore, Digital Trends and Creative Bloq, among others. He was previously commissioning editor at MacFormat magazine. That means he mostly covers the world of Apple and its latest products, but also Windows, computer peripherals, mobile apps, and much more beyond. When not writing, you can find him hiking the English countryside and gaming on his PC.
