How to build a Linux-powered smart home
Add some intelligence to your home and offices
Mailcow:Dockerized
Nextcloud’s own groupware, its Calendar, Talk and Mail applications, can be used for collaboration among users.
The Mail app is just a client, so you set it up with a provider just as you would in a desktop email client.
It’s often been said (including by us) that setting up an email server properly is hard.
This is true, but we can set up a rough and ready container running Postfix, Dovecot and Roundcube and have a working (but not necessarily well-configured) email set up in just a few keystrokes thanks to the Mailcow:Dockerized image.
Setting this up might offend the sensitivities of those adverse to running things as root, but the image uses extended attributes and requires it.
So let’s be a superuser and check our umask is set correctly (it should print 0022):
$ sudo -i
# umask
Now we’ll clone the repository into /opt:
Are you a pro? Subscribe to our newsletter
Sign up to the TechRadar Pro newsletter to get all the top news, opinion, features and guidance your business needs to succeed!
# cd /opt
# git clone https://github.com/mailcow/mailcow-dockerized
# cd mailcow-dockerized
# ./generate_config.sh
You’ll be asked for your domain name; this is the host that it’s running on, not the domain of any email addresses you want to set up.
If your machine has limited memory the script will suggest you disable Solr (the heavy-duty Java search platform), which you should.
The script generates mailcow.conf which you may wish to tweak. We’ll just plough right ahead. First, in case they get in the way, stop Nextcloud and any other containers now.
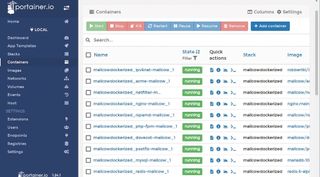
In Portainer do this by choosing Containers from the menu on the left, selecting all of them except Portainer (because that would be silly), and pushing the stop button.
There’s a Kill button next to it in case they don’t shut down gracefully, and you can also remove them entirely if you don’t like them. Now return to the terminal (still using the root account) and let’s fetch and unleash the Mailcow:
# docker-compose pull
# docker-compose up -d
At this point, you technically have a working mail server. You should now be able to log in from the web interface, using the credentials admin:moohoo
But there’s still a lot of configuration to do. Not least of this involves changing that password, which can be done by clicking Edit next to the admin user to do this.
If you want to receive mail you’ll need to properly set up MX records for your domain(s) with your DNS provider, otherwise mail won’t be routed correctly.

Once you’ve done that, you can configure them from Mailcow’s Domains section, then you can configure the actual addresses in the Mailboxes section.
In a world of endless spam, it’s important to do your bit by enabling DKIM (Domain Keys Identified Mail), which signs messages originating from your server. DKIM-enabled servers will verify this key when they receive mail from your domain, preventing malfeasance.
